PROBLEM:
- You have a bunch of User Defined Metrics (UDM) setup in OEM, and you want to know the staus of each of them.
- OEM does not provide a single page to show the status of UDMs - users must navigate to each instance and look at the UDM page.
- Create a standard OEM Report to display all of your UDMs in one place!
- First, if you have not already discovered this the hard way, you cannot create a Report against a non-EMREP/non-Repository tables. Why, i'll never know. But, whatever. The thing is, if you try to create a report using something easy like showing how many records are in an Target Database table, it will return the error "ORA-00942: table or view does not exist"
- In this case, we are actually hitting an OEM Repository table, but it's not one of the objects we are allowed to query via the "Table From SQL" report element type.
- Fortunately, "bwolter" found a work-around for this sorry situation and published how to it in this Oracle OEM Forum post.
- Follow his 3 easy steps, then continue with my Step 5 below.
- Create a new Report and choose whatever you want for Category, etc.
- Set the "Targets" value to the "Use the specified target" radio-button and select your Repository SID
- Set the "Privileges" value to "Run report using target privileges of the report owner (SYSTEM)"
- Click the "Elements" sub-tab, then Add a new element using the new "target_user_table_from_sql" type.
- Click the "Set Parameters" icon and enter your SQL. Note that your value of KEY_VALUE will be different than mine!
SELECT DISTINCT UPPER(target_name) "Target Name",
       key_value || '__' "Metric Name",
       TO_CHAR(collection_timestamp, 'MM-DD-YYYY HH24:MI') "Last Collected_____",
       string_value "Metric Value"
  FROM sysman.em$current_metrics
 WHERE metric_name = 'SQLUDM'
   AND UPPER(key_value) LIKE 'ENSURE%'
   AND string_value IS NOT NULL
ORDER BY 1, 2- My KEY_VALUE (the "Name" you used for the UDM) is "Ensure PMON is running as MST", so obviously you will set your value to whatever the Name of your UDM is.
- Rinse-and-repeat Steps 8-10 for each UDM type or gorup you want to show on the Report.
- I use underscore in my column alias names to stretch the columns out for easy reading.
- During this project I found a UDM which had encountered errors and stopped running! OEM showed no indication outside of a small icon on the Instance's UDM page (nor did it send a notification). This report will save you from that potential embarrasement!!
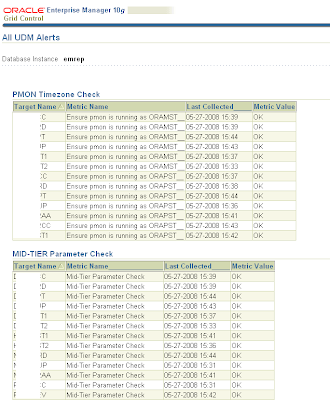
- Here is what my final UDM Report looks like:
